strongswan 与 VPC 共同搭建隧道
场景示例
业务现状:
客户业务在迁往云平台的过程中,因为两边的数据需要同步,所以需要建立站点到站点 IPSEC 隧道,由于本地 IDC 设备不支持 VPN 服务,所以采用 strongswan 的方式自建 IPSEC 隧道。
环境信息:
-
云上 ap2a 区域 VPC 信息
- 私有网络:172.25.100.0/24
- 公网 IP:139.198.120.221
-
pek3 云服务器信息(模拟本地 IDC 机房服务器)
- vm1 私网 IP: 172.20.100.180
- 公网 IP: 139.198.13.15
- 私有网络:172.20.100.0/24
操作目的:
实现 172.25.100.0/24 与 172.20.100.0/24 的网络互通。
操作步骤
-
在 pek3 区的云服务器上安装 strongswan。
sudo apt update sudo apt install strongswan strongswan-pki -
配置内核参数。
$ cat >> /etc/sysctl.conf << EOF echo net.ipv4.ip_forward = 1 net.ipv4.conf.all.accept_redirects = 0 net.ipv4.conf.all.send_redirects = 0 EOF $ sysctl -p /etc/sysctl.conf -
生成预共享秘钥。
openssl rand -base64 16 -
在 pek3 云服务器上配置隧道环境参数。
-
配置预共享秘钥。
vi /etc/ipsec.secrets配置如下信息:
#本地公网出口IP #对端公网出口IP #双方约定的秘钥 139.198.121.220 139.198.13.15 : PSK "oCTYi71l0ZU7WcRgLYaspg==" -
配置 ipsec.conf。
可参考官方文档的配置。
version 2.0
include /etc/ipsec.d/*.conf

config setup
    cachecrls=yes
    strictcrlpolicy=yes
    plutostderrlog=/var/log/ipsec.log

conn %default
    rekey=yes
    authby=secret
    auto=start
    type=tunnel
    keyexchange=ikev1
    pfs=no
    dpddelay=15
    dpdtimeout=60
    dpdaction=restart
    #nat_traversal=yes

conn toap2a
    authby=secret
    left=172.20.100.180
    leftid=139.198.13.15
    leftsubnet=172.20.100.0/24
    right=139.198.121.220
    rightsubnet=172.25.100.0/24
    ike=3des-md5-modp1536!
    esp=3des-md5-modp1536!
    ikelifetime=1h
    lifetime=8h
    auto=start
-
-
ap2a VPC 的环境配置(VPC 自身具备 IPSEC 服务)。
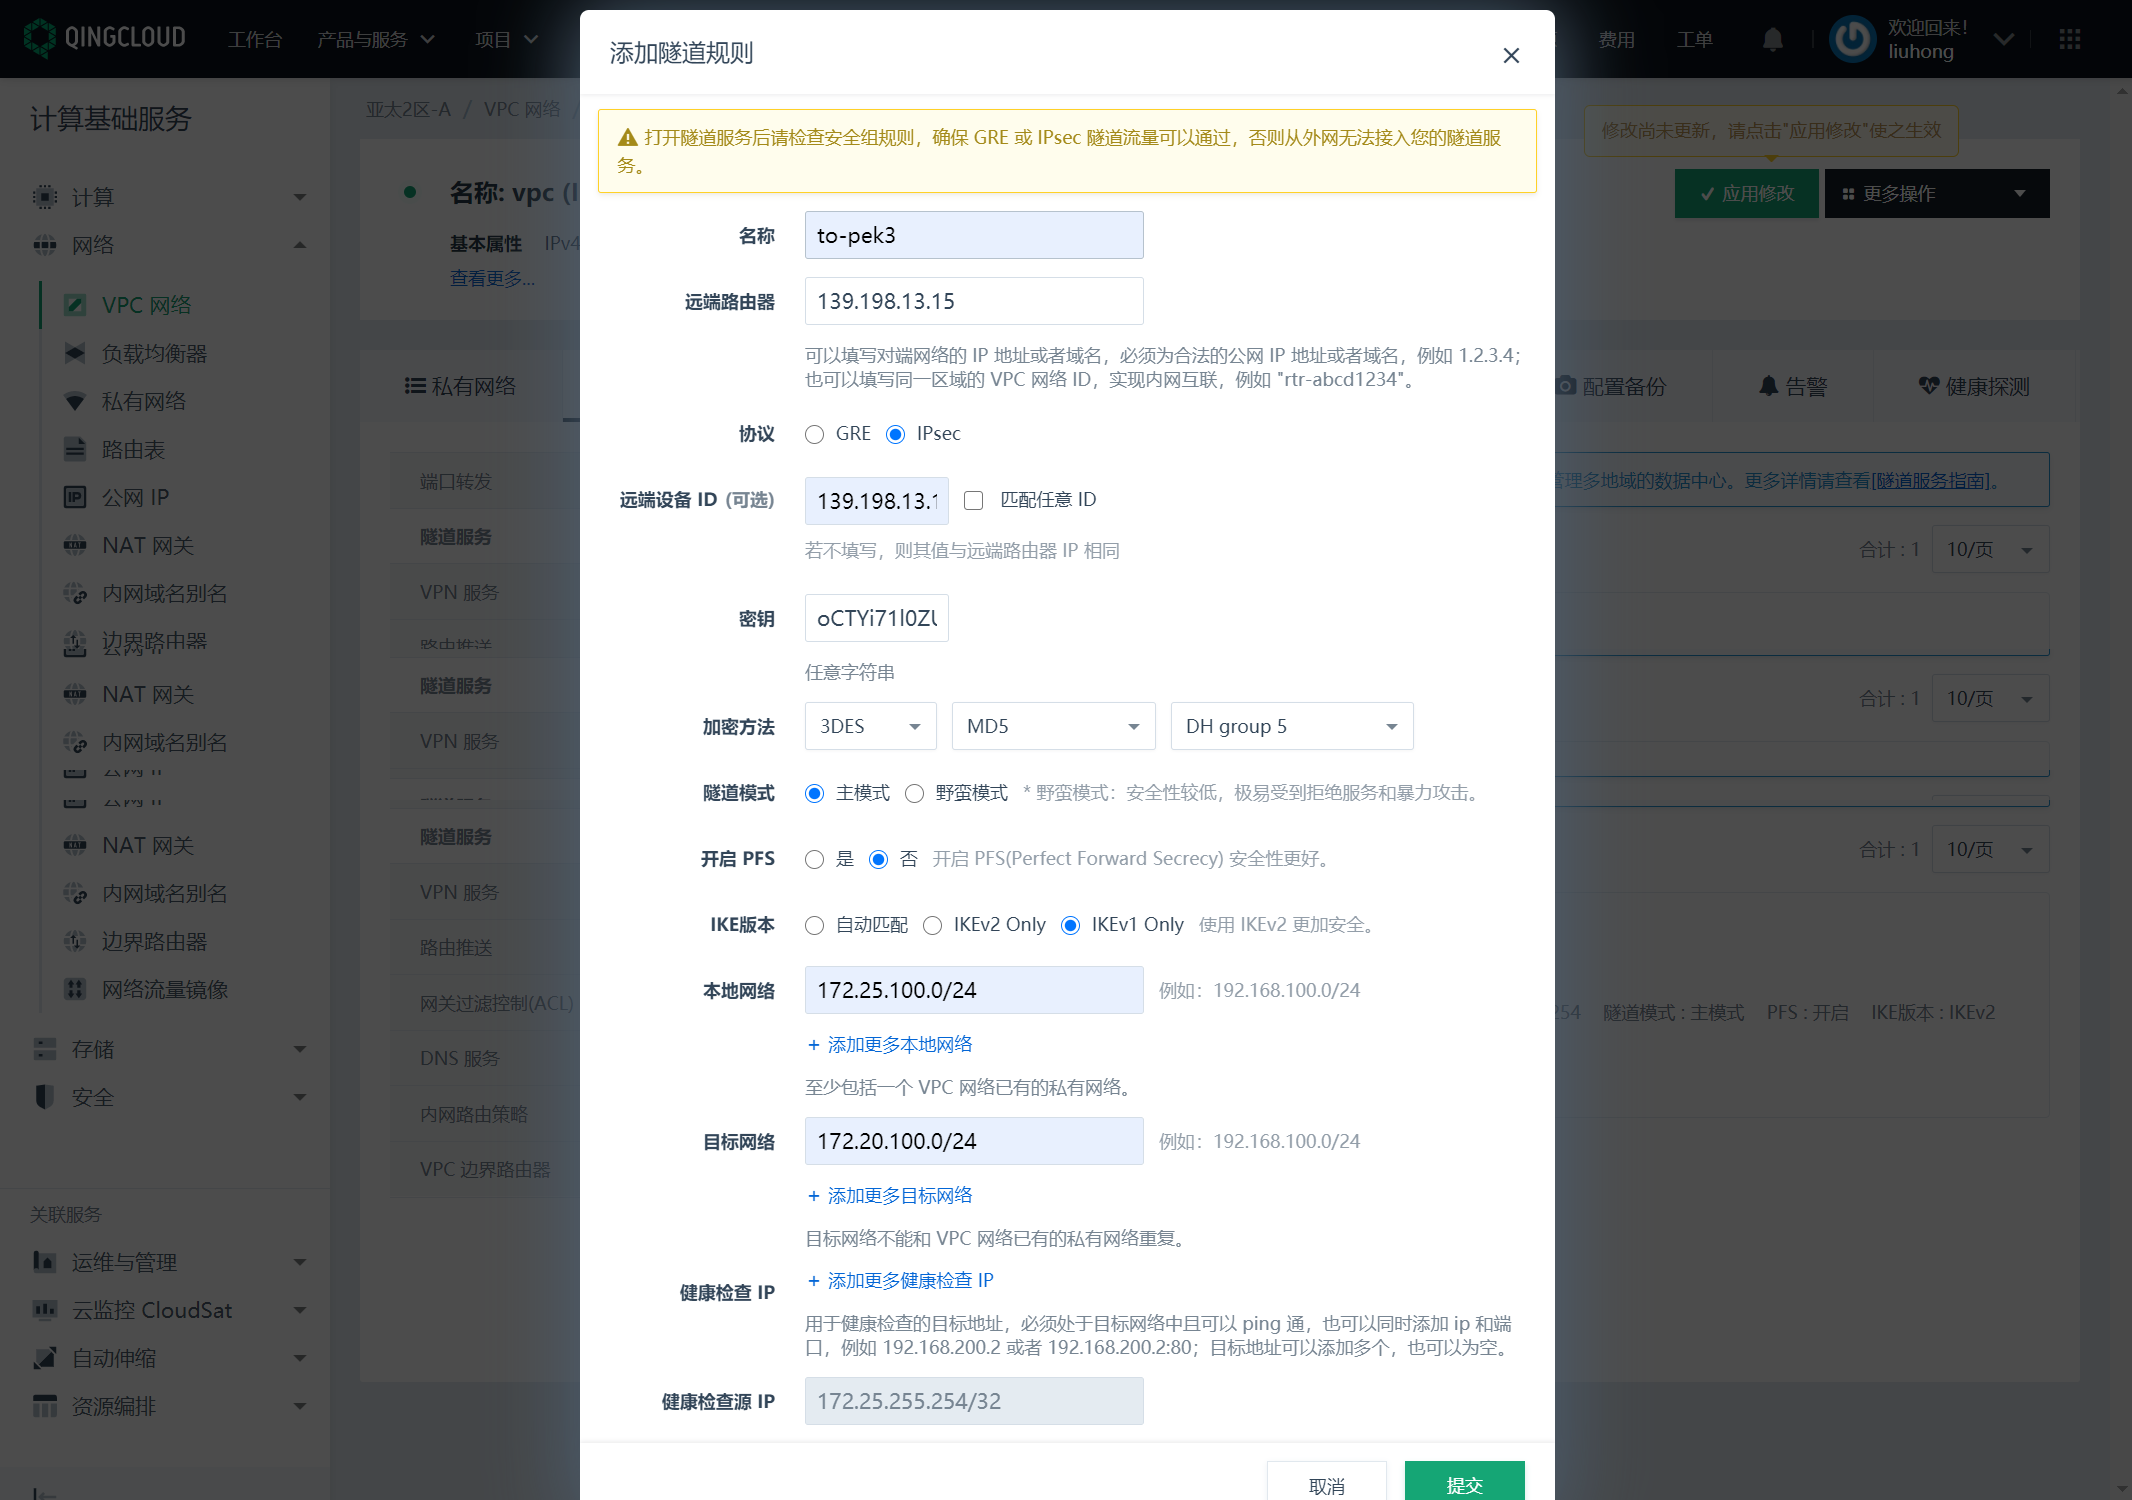
ipsec.conf 的配置如下:
version 2.0 include /etc/ipsec.d/*.conf config setup listen=10.160.1.49 protostack=netkey nat_traversal=yes keep_alive=60 virtual_private= oe=off # debug #plutodebug="all" # log #plutoopts="--perpeerlog" #plutostderrlog=/var/log/ipsec.log conn %default rekey=yes authby=secret auto=start type=tunnel keyexchange=ike phase2=esp pfs=yes dpddelay=15 dpdtimeout=60 dpdaction=restart conn 139.198.13.15 left=10.160.1.49 leftid=139.198.121.220 leftsubnets={172.25.10.0/24} right=139.198.13.15 rightid=139.198.13.15 rightsubnets={172.20.100.0/24} ike=3des-md5;modp1536 phase2alg=3des-md5;modp1536 pfs=no ikev2=no -
启动 strongswan 服务。
systemctl start strongswan systemctl enable strongswan -
查看服务端口监听。
netstat -unptl回显如下:
Active Internet connections (only servers) Proto Recv-Q Send-Q Local Address Foreign Address State PID/Program name tcp 0 0 127.0.0.53:53 0.0.0.0:* LISTEN 660/systemd-resolve tcp 0 0 0.0.0.0:22 0.0.0.0:* LISTEN 745/sshd tcp 0 0 127.0.0.1:6010 0.0.0.0:* LISTEN 12290/sshd: root@pt tcp6 0 0 :::22 :::* LISTEN 745/sshd tcp6 0 0 ::1:6010 :::* LISTEN 12290/sshd: root@pt udp 0 0 127.0.0.53:53 0.0.0.0:* 660/systemd-resolve udp 0 0 0.0.0.0:68 0.0.0.0:* 683/dhclient udp 0 0 0.0.0.0:4500 0.0.0.0:* 25435/charon udp 0 0 0.0.0.0:500 0.0.0.0:* 25435/charon udp6 0 0 :::4500 :::* 25435/charon udp6 0 0 :::500 :::* 25435/charon -
启动 IPSEC 服务,并查看隧道连接状态。
ipsec start ipsec statusall -
测试网络是否联通。
ping 172.25.100.2回显如下,网络连接成功。
PING 172.25.100.2 (172.25.100.2) 56(84) bytes of data.
64 bytes from 172.25.100.2: icmp_seq=1 ttl=62 time=37.7 ms
64 bytes from 172.25.100.2: icmp_seq=2 ttl=62 time=37.8 ms
64 bytes from 172.25.100.2: icmp_seq=3 ttl=62 time=37.8 ms
64 bytes from 172.25.100.2: icmp_seq=4 ttl=62 time=37.8 ms
64 bytes from 172.25.100.2: icmp_seq=5 ttl=62 time=37.7 ms
^C
--- 172.25.100.2 ping statistics ---
5 packets transmitted, 5 received, 0% packet loss, time 4003ms